Get gorgeous -- at home!

Get gorgeous -- at home!
![]() by Admin Mon Oct 22, 2007 3:16 am
by Admin Mon Oct 22, 2007 3:16 am
- Code:
If you feel like pampering yourself but don't want to spend hundreds of rupees at a beauty parlour, don't fret! Here are some easy home beauty treatments that will have your skin, hands and feet looking their best at a fraction of the cost.
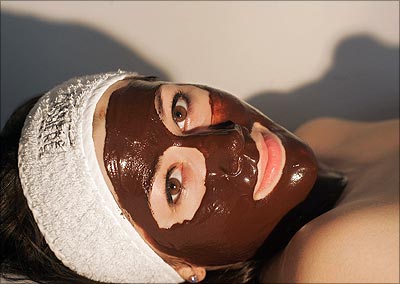
Good home facial
It's possible to get that glow on your face in one hour and in the comfort of your own home. All you have to do is go through these simple steps to have your face feeling rejuvenated and refreshed.
Like for all procedures, a facial needs three things -? key ingredients, the process list and some wholesome enthusiasm.
Remember, a facial will take time SO keep yourself free for an hour or two.
There is a run-up to the process. Here's what you need to do before you get down to a facial:
~ A good time to do a facial is at night. Ideally, it is required that you do not face harsh sunlight immediately after a facial.
~ Secondly, you should avoid applying soap to your face at least for 8-10 hours after a facial. The chemicals of some soaps may react with your sensitive skin and cause a reaction.
- Code:
~ Your skin needs to rejuvenate after the facial. And hence, a good night's sleep will work wonders.
~ If you are getting this facial for an occasion, remember to plan in advance. A facial takes about a day or two to truly show results. So, plan accordingly.
~ Whatever ingredients you use, such as creams and packs, need to be tested before they are applied to the entire face. So, try small samples first. Most of us know what our skin types are. It would also be advisable to put these on your hand for say 15 minutes to check if you are allergic to some of the products.
~ The process might be a bit messy, so put on an apron or old outfit that you do not use anymore.
- Code:
Ingredients and procedureNow that you've set aside a couple of hours and are ready to begin, here's what you need:
Requirements
~ A good facial cream
~ A blackhead remover (a plastic one is recommended)
~ Hair band
~ Two towels (one large, one small)
~ One orange
~ Coarsely ground moong dal
~ An egg (may be substituted with cream)
~ Few mint leaves
~ One tablespoon of honey
~ One tablespoon of vinegar
~ One tablespoon of multani mitti
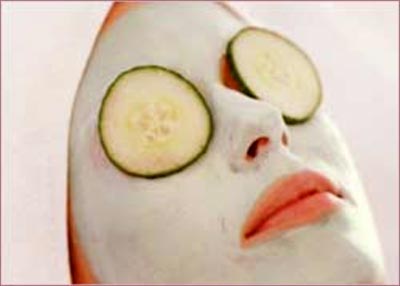
~ Few thin slices of cucumber or potato
How to make the face pack
Mix the egg, mint leaves paste, honey, vinegar and multani mitti to form a thick paste.
Alternative to a face pack
Take one fresh potato, grate it and squeeze to extract juice. Mix this juice with a few drops of lemon juice. Apply a little of the juice on your face using a swab of cotton wool. Let it dry for 5 minutes and wash off. It is the best pack for removing dark spots and blemishes.
The procedure~ Remove any makeup, clean your face with a good soap. Towel it dry.
~ Apply the cream on your face and massage your face in a circular motion. Remember to be gentle to the skin around your eyes. Do this for 10 minutes, until your skin feels tingly. ~ Add the moong dal on your face and scrub in a circular motion. Do not scrub too hard.
~ Heat some water in a pan until you see steam rise. Hold your face above the steam. Your face should be at a comfortable distance to avoid getting scalded and put a towel over your head to prevent the steam from escaping. Let the steam wash over your face for at least five minutes.
~ Once done, take a small ball of cotton and wipe the dal scrub from your face.
~ Take the black head remover and gently run it over your white and black heads. Special areas to look for are the nose and chin ridges.
~ Apply some more cream and massage gently for some time.
~ Remove the cream and apply the face pack all over in a thick layer. Place the cucumber or potato slices over your eyes. Now lie down for 10-15 minutes until the mask stiffens.
~ Wash the mask away with plain water.
~ You may even bleach your face before this, to lighten facial hair and get a better glow. However, you can even do it a day later.
- Code:
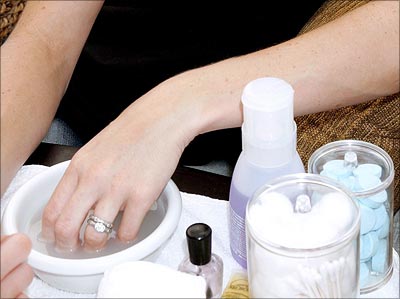
Home manicures and pedicures
Home pedicures and manicures are probably one of the easiest beauty treatments to do on your own.
All you need is the determination and knowledge. The reason to take recourse to this may be something as simple as your parlour being inaccessible (across town). Or it may be something as unavoidable as a hectic work schedule.
Simple as it may sound, you do need a few requisites before you start the process. Here's a list:
~ Identify a place where you will do the manicure or pedicure. This could be your bedroom or your living room. Remember that you need place to put the tub of water and also be able to relax after you have done your pedicure.
~ Create a checklist of what is required for the pedicure/manicure. You will need to plan this a day in advance since you may need to buy the raw material. However, once bought, rest assured you can use this for almost five-eight pedicures/manicures depending on your usage.
~ Tell the folks at home not to disturb you for 30-45 minutes. Keep yourself hassle-free. Keep the phone on silent and get ready to relax.
Requirements
~ A good quality pedicure/manicure set (you can get loads of them these days, even in the Rs 49-99 shops)
~ Two towels (one large for your feet, one medium-sized for cleaning)
~ A good cream
~ Acetone
~ Cotton
~ A good scrubber or Pumice stone
~ A tub big enough to soak your feet
~ Nail enamel/polish of your choice
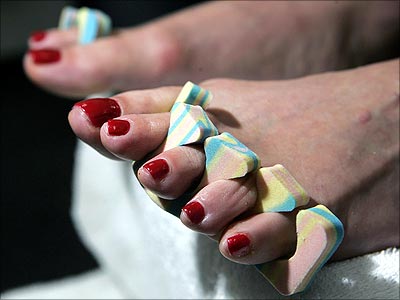
The procedure
Here's a step by step description of how to give yourself a manicure. Follow the same treatment for your feet, if you feel liek having a pedicure as well.
~ Remove all traces of nail enamel from your fingers using acetone. Wash your hands thoroughly with warm, soapy water. Sponge your hands dry.
~ Keep some hot water in a tub befor eyou begin. It will temper down to an ambient temperature when you need to immerse your hand and feet in it. ~ Apply cream generously on your hands.
~ Begin massaging. Remember to massage in a circular motion. Hands are easier since any massage will impact both the hands. Massaging will help improve blood circulation. Press the massaged area gently occasionally. Do this for at least 5-10 minutes.
~ Remove excess cream with cotton.
~ Immerse the part that has cream in the warm water for 5-7 minutes. Let the skin feel nice and warm. Once the skin is slightly shrively, remove your hands or feet from the tub.
~ Keep the big towel handy so that you can immediately wrap your hands or feet with the towel. Mop them dry.
~ Take some more cream and put it on the nails. Gently push back the cuticle using a file from the manicure set. (The cuticle is the excess skin that creeps over the nail.) You can also use a small bamboo stick or a match stick to perform this process. Do it gently so that you do not tear the skin. Once done, remove the excess cream.
~ Clip broken skin that appears around the nails with a pair of fine scissors.
~ Trim and shape your nails.
~ For feet use a scrubber to remove dead skin.
~ Apply some more cream and massage briefly.
~ Next, apply the nail enamel on your hands and feet. The process is simple. Apply the base coat. This could be a transparent shade. Wait till it dries. Apply the second coat. Wait again. Apply the third and the last coat.
- Code:
Some helpful tips
Here are some tips to help you get teh best out of your home beauty treatments.
~ Feet require more care than hands. Therefore remember to massage and soak your feet longer.
~ While scrubbing the feet remember to be gentle. Do not scrub hard enough to cause wounds.
~ If you have calluses on your hand remember to scrub them gently. You can use a pumice stone for this.
~ Before you apply nail polish, it is essential to remove any excess oil from the nails.
~ While applying nail polish on your feet remember to keep a small gap between the skin surrounding the nail and the actual polish. This way the nail polish does not come off quickly.

Please remember to give your feet and hands some rest after the pedicure and manicure. This treatment can be repeated every 15 days depending on your lifestyle.
Admin- Admin
- Number of posts : 113
Registration date : 2007-10-17 -

Permissions in this forum:
You cannot reply to topics in this forum|
|
|